IP Address Assignment Methods and Intradomain Routing
- Consider the network shown below. In this network, the metric of each link is set to 1 except link A-B whose metric is set to 4 in both directions. In this network, there are two paths with the same cost between D and C. Old routers would randomly select one of these equal cost paths and install it in their forwarding table. Recent routers are able to use up to N equal cost paths towards the same destination.
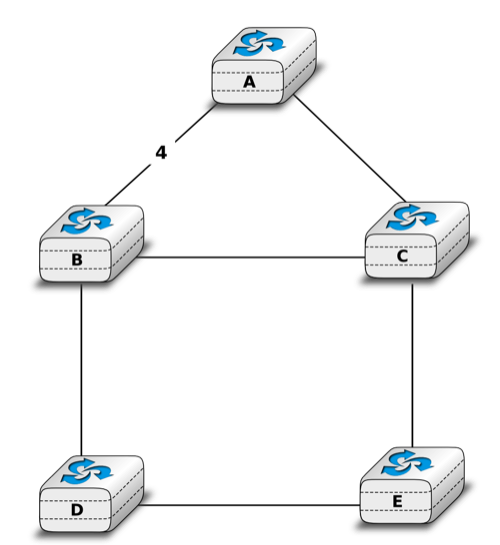
A simple network
On recent routers, a lookup in the forwarding table for a destination address returns a set of outgoing interfaces. How would you design an algorithm that selects the outgoing interface used for each packet, knowing that to avoid reordering, all segments of a given TCP connection should follow the same path ?
Warning
This is an unpolished draft of the second edition of this ebook. If you find any error or have suggestions to improve the text, please create an issue via https://github.com/obonaventure/cnp3/issues/new
This lab allows you to experiment with the main IPv6 address techniques and illustrates the operation of two intradomain routing protocols (OSPFv3 and RIP). For this, you will use 4 netkit labs: /netkit/netkit-lab_slaac.zip, /netkit/netkit-lab_dhcpv6.zip, /netkit/netkit-lab_ospfv3.zip and /netkit/netkit-lab_rip.zip.
You will need to observe into the packets exchanged in the emulated network to understand the operation of the involved protocols and mechanisms. For this, you can use packet capture tools (such as tcpdump or wireshark).
Some tcpdump options (for more details and options, check man tcpdump):
-iallows to choose a specific interface (anyfor all interfaces).
-v(or-vv) provides a verbose more with more details on the contents of each packet
-sallows to capture the entire packets (not only the first 68 bytes).
Wireshark also allows to capture packets but provides a graphical user interface that is useful to analyse long packet traces. Wireshark is installed on the Linux machines in the lab and can be downloaded from http://www.wireshark.org
Note
If you have root access to the machine, you can also use wireshark to visualize traffic captured within a netkit lab :
When you have launched the lab, you can access to your $HOME directory or the lab directory (in the host machine) from a netkit virtual machine. These directories are located in /hosthome and /hostlab in netkit . Go into /hostlab :
cd /hostlabNow you can launch a
tcpdumpcapture and save the captured traffic on a file, in the hostlab (or hosthome) directory (option-w). This allows you to start a capture from this file withwireshark.tcpdump -n -i IF -w aaa.pcap &where
aaa.outis the output file,IFthe interface we want to listen on (useanyfor all interfaces) and we add the&symbol to run the sniffer in the background, so we can continue to work in the netkit shell.You can then launch
wiresharkon your computer with the input fileaaa.out:wireshark -k -i<(tail -f aaa.pcap)&Note that this is not possible if you are a non-privileged user in the machine. Therefore, if you are running netkit in the INGI lab you should use
tcpdumpto look at on-the-fly traffic.
IPv6 Address Assignment Methods
The SLAAC lab
The first lab (/netkit/netkit-lab_slaac.zip) illustrates the operation of the Stateless Address Autoconfiguration (SLAAC) in IPv6. This mechanism allows hosts connecting to an IPv6 link to dynamically acquire a link-local address and, in case a router is present, to be assigned a global-scope IPv6. The link-local address enables a host to exchange packets with any other host in the same IPv6 subnet. Global-scope IPv6 address enables to communicate outside the local subnet.
Start the /netkit/netkit-lab_slaac.zip lab in netkit. This lab consists of 4 virtual machines: 3 hosts (hostA, hostB and hostC) and router r, connected as shown in the figure below
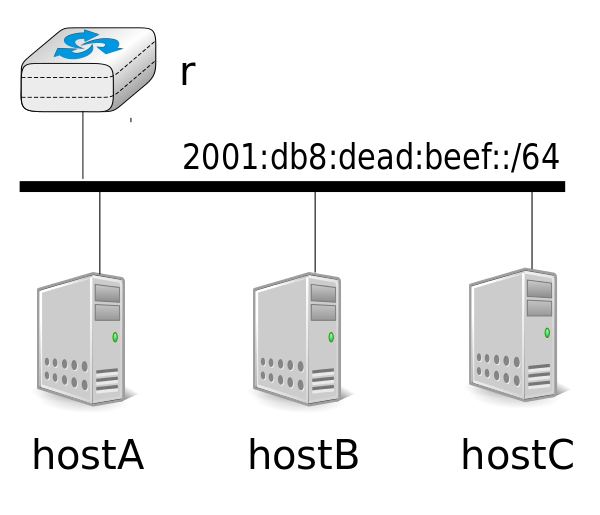
Router r uses IPv6 address 2001:db8:dead:beef::11/64 and is configured to send periodically Router Advertisements and reply to Router Sollicitations, via the radvd daemon. You can stop/restart this daemon by using the /etc/init.d/radvd script. The configuration of this daemon is detailed in file /etc/radvdv.conf. The configuration used for the lab is provided below.
interface eth0 {
    AdvSendAdvert on;
    MinRtrAdvInterval 3;
    MaxRtrAdvInterval 10;
    prefix 2001:db8:dead:beef::/64
    {
        AdvOnLink on;
        AdvAutonomous on;
        AdvRouterAddr on;
    };
};
Unlike previous labs, IPv6 addresses are not configured with ifconfig(8) on the virtual hosts. These addresses will be obtained dynamically. All host interfaces are down at the startup, so you need to activate them with ifconfig eth0 up when you are ready to monitor the address assignment process. Use tcpdump on a host (for instance, hostA) to capture the packets in the link (or wireshark if you have root access to your machine). Look at the exchanged packets when the interfaces are activated.
- How are global-scope addresses assigned ? Describe the observed router discovery process.
- How do hosts acquire their link-local addresses ? How do these link-local addresses look like ? For this question, you can set an interface down and up to observe the acquisition of a new link-local address without restarting the lab.
The DHCPv6 lab
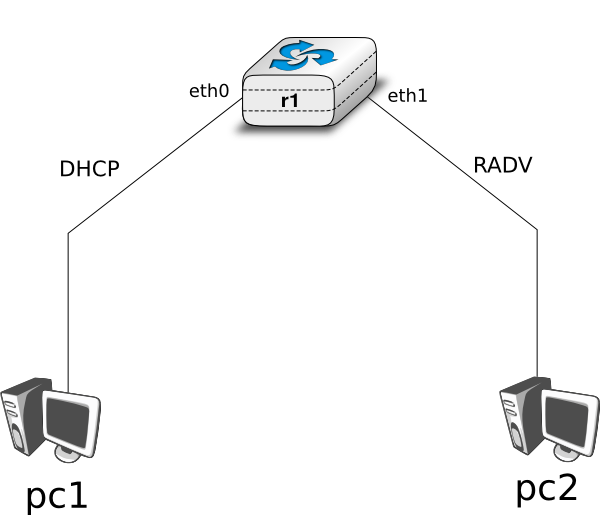
The goal of the /netkit/netkit-lab_dhcpv6.zip lab is to observe the operation of DHCPv6. In this lab, you will work on an emulated network with one router (r1) running a DHCPv6 server and 2 emulated hosts (pc1 and pc2) running DHCPv6 clients.
Here is the topology of the network:
To use DHCPv6, these virtual machines uses the dibbler daemon.
When the lab is launched, run the dibbler server daemon on the router, then run the client daemon on the hosts (pc1 and pc2). Startup scripts are provided for each of these daemons.
/etc/init.d/dibbler-server start
/etc/init.d/dibbler-client start
Based on the observed packets, try to figure out:
- Why the server sends periodically multicast packets ?
- What kind of packets are exchanged between the server and the clients? (You should identify 4 different types)
Intradomain routing
We focus on two intradomain routing protocols : RIP and OSPFv3.
The OSPFv3 lab
The Open Shortest Path First (OSPF) protocol is a link-state routing protocol, widely used in today’s Internet for intra-domain routing. OSPFv3 (OSPF for IPv6) is specified in RFC 5340. OSPF control packets are sent directly over the IP layer, with protocol number 89, so they can be filtered with tcpdump with the command tcpdump ip[9]==89.
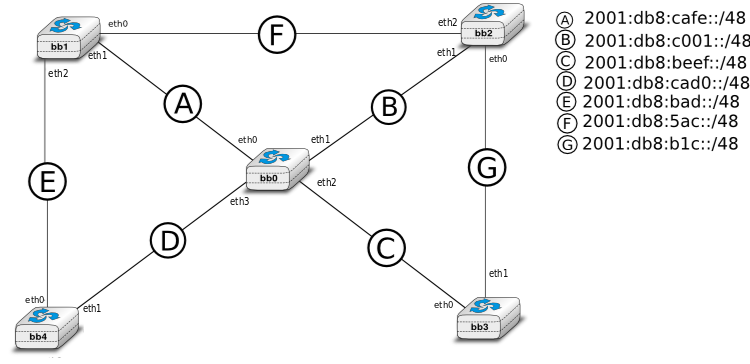
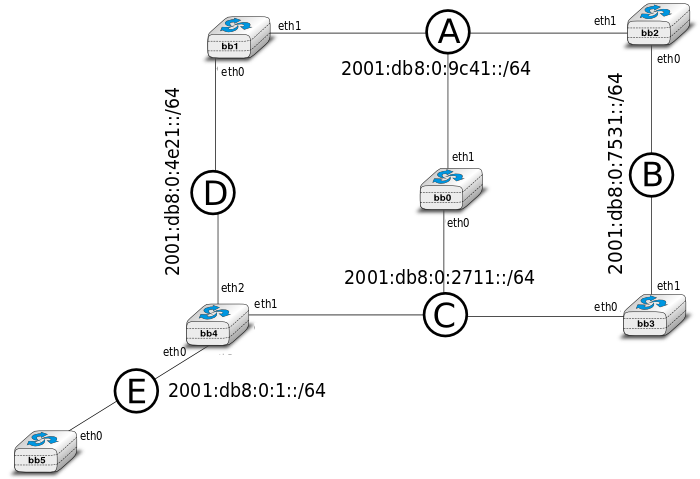
In the /netkit/netkit-lab_ospfv3.zip lab, you will work on a network with routers that use OSPFv3 to compute their routing tables. Here is the topology of the network:
To use OSPF, these routers uses daemons called zebra and ospf6d .
Start the lab. Note that, if you try to ping6 from a router to a non-adjacent one, you will see a destination unreachable. This is because the OSPF deamon is not launched yet. It is interesting to run tcpdump (in the background) on at least one machine, to capture the exchanged packets.
You should launch the ospf6d daemon on every router, looking at how every new OSPF-enabled router impacts in the monitored traffic. Launch first the daemon on bb1. To do that enter the following command line in the bb1 terminal :
/etc/init.d/zebra start
Then launch the daemon on bb2, ...
- Which packets have you observed in the packet traces ?
- Were the routing tables modified ? If so, how ?
Launch now the deamon on the others routers while looking at the packets captured.
- Perform traceroutes from/to different interfaces. Think about the path the traceroute is expected to take, and the path ICMP replies are expected to take. Does the traceroute6(8) confirm your expectations?
Now we will access the ospf6d daemon. This will help us to see the OSPF link-state database (LSDB), neighbors and routes.
In netkit, type :
telnet ::1 ospf6dNote
Reminder:
::1is the IPv6 address for localhost.ospf6dis the name of the daemon[#fservices]_ that runs OSPF in our router.
The daemon asks for a password. Use the default one, zebra.
Now you can interact with the OSPF daemon and observe its current state and the datastructures that it maintains. Some useful commands are :
show ipv6 ospf6 database
show ipv6 ospf6 neighbor
show ipv6 ospf6 route
show ipv6 ospf6 interface
exit
- What is the information returned by each of the above commands ?
- Is the LSDB the same for all routers ? Should it be ?
Now it is time to play with the topology. You can request the shortest path tree computed by a router (and monitor how it changes) with the command show ipv6 ospf6 spf tree when connected via telnet to the ospf6d daemon.
Try to disable some link sand observe what is happening. You can disable a link with the ifconfig(8) command :
ifconfig IF downwhere
IFis the name of your interface. (If you want to set up an interface down, remember that manually assigned static IP addresses vanish when the interface is down, so you need to assign them manually when you set it up again)When you are in the daemon (
telnet ::1 ospf6d) , change the link cost and try sometraceroute. Below, the line you should enter in your console:telnet ::1 ospf6d zebra enable configure terminal router ospf6 interface IF ipv6 ospf6 cost X
where
IFis the interface andXthe new cost.
The RIP lab
The Routing Information Protocol (RIP) is a popular distance-vector protocol. It was widely used for intra-domain routing in the Internet, before being replaced by link-state protocols such as OSPF or IS-IS. RIPng (for IPv6) is specified in RFC 2080. RIPng packets are UDP packets and are sent to port 521, so you can filter RIPng packets with this command: tcpdump udp and port 521.
In the /netkit/netkit-lab_rip.zip lab, you will work on a network composed of routers that use RIPng to build their routing tables. Here is the topology of the network:
To use RIP, these routers use daemons called zebra and ripngd .
After launching the lab, use tcpdump at the machine sniffer. This machine has 5 interfaces, each of them connected to a different network link (see the topology description in the file lab.conf and the interfaces configured in the sniffer.startup file).
First of all, launch the ripngd and zebra daemons. To do that, type on each router the command :
/etc/init.d/zebra start
Observe the evolution of the routing table of one router. After a while, all destinations are available. Why it is not instantaneous?
- Check routing tables. Are they updated ?
- Sniff the RIP packets using
tcpdumpand observe them. Is this consistent with what you expected ?
Now it is time to modify the topology.
Try to make some links fail and observe what is happening. You can do that by stoping one interface on a router :
ifconfig IF downwhere
IFis the name of your interface.Observe what is happening. Is the network recovering fast ? Why ?
Assignment
Some networks still rely on manually configured static routes. Static routing provides some flexibility compared to distance vector routing, but suffers from two important problems. First it does not react to failure. Second, configuration errors can cause forwarding loops and blackholes.
/netkit/netkit-lab_err1.zip, /netkit/netkit-lab_err2.zip and /netkit/netkit-lab_err3.zip are three netkit labs describing networks with four routers (r1 to r4). The routes in each network are configured with static routes, but routing is not correct. You can extract the netkit labs from the corresponding ZIP files (laberr1.zip for laberr1, and so on).
For each lab, find the errors by using traceroute6(8) or observing the routing tables of the routers. Then, propose a fix for each problem so that every router can reach successfully (e.g. with ping6) every other router in the network.
Footnotes
| [1] | The file /etc/services is consulted by telnet(1) to convert the name ospf6d into a port number. |